Different Drawing Techniques to use in the Art Classroom
An exciting curriculum includes a broad range of different drawing techniques created with different media. I’m always looking for ways to get my students excited by drawing. Regularly offering different drawing techniques can be a small part of a larger plan and allows more students to find success.
It is important to educate our younger students about the difference between observational drawing and drawing from the imagination. Teaching observational drawing, amongst other things, is teaching children how to look.
Your students should also know the difference between primary and secondary sources. A primary source is one that you study from first-hand experience. It is there in front of you, for example, an apple, a skull or a person. You can create a drawing, painting or photograph from a primary source. A photograph is not a primary source, just like a drawing isn’t a primary source; both can be created from a primary source.
A secondary source is materials produced by someone else. For example, a newspaper article, a photograph, a film, music or a painting.
Line Drawing
A line drawing is a drawing made of only lines. It does not include any shading. I can’t teach line drawing without talking about ‘quality of line‘. If a drawing includes ‘quality of line’, it includes lines of different thicknesses/weights created by applying different pressures to the pencil. The snail below is a good example where you can easily see lines of different thicknesses. Another name for ‘quality of line’ is ‘weight of line‘.
Students need to be taught about applying different pressures with a pencil and allowed to practice.
Tone/Value Drawing
A tone drawing is a drawing that includes shades of varying lightness and darkness. Some countries will call this a ‘value drawing’. The tones are created through shading and/or mark making.
Mark Making
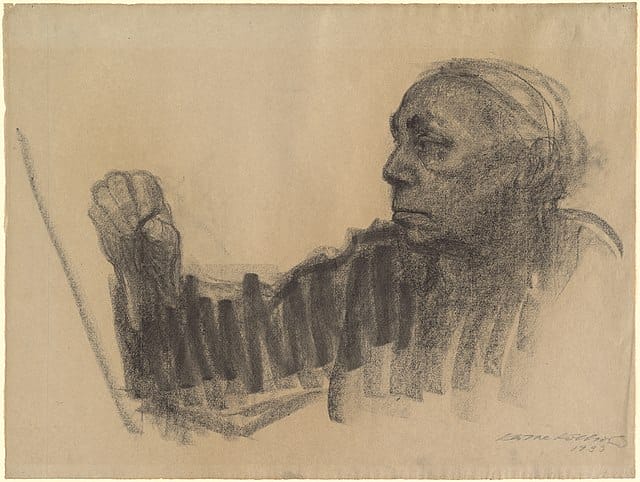
It is widely accepted that interesting drawings often include different types of mark making. Showing our students drawings by Van Gogh, Vince Low and Kathe Kollwitz or other artists that use mark making, is a good way to open their eyes to its potential.


Drawing with Hatching and Cross Hatching
Hatching is a drawing technique where closely spaced parallel lines are used to create tone/values. Cross Hatching is a drawing technique where sets of parallel lines are placed over each other to create different tones/values.
The drawing below includes bold hatching where the hair would be and subtle hatching and cross hatching on the face. This is by student Lima and you can see more of her work here.
Drawing with Dip Pens
If you are lucky enough to have a class set of dip pens, you can expose your students to yet another drawing implement. It allows your students to draw in black or colour, and lends itself to mark making.
The star anise below have been drawn with sepia ink and include wonderful hatching, cross hatching and mark making.
Contour Drawing & Blind Contour Drawing
A contour drawing is a line drawing that focuses on the outline of the object being drawn and tries to capture the mass and volume of the subject matter rather than the detail. The outlines of major shapes within the subject of the drawing can also be included. It comes from the French word ‘Contour’, which means ‘outline’.
Blind Contour
A blind contour drawing is where the artist looks only at the subject matter of the drawing and not the page they are drawing on. This leads to confident, fluid, gestural lines and makes the artist really study what they are drawing. One way to complete this task in class, is to get students to put their paper in a large bin bag so they can’t see their hand at work. It’s a fun activity!
Continuous Line
A continuous line drawing is a drawing where the drawing implement is not taken off the page whilst the drawing is created. The advantage of making our students try this method is that it creates fluid, quick and confident drawings.
You can also give students a time-limit to create the drawing and make it a fun challenge that they don’t take their pen/pencil off the page. The drawing implement can go back along lines to create darker tone/values and students can also apply different pressure.
You can also create ‘Blind Continuous Line Drawings’.

Stippling
Stippling is the art of making a drawing out of numerous, tiny dots. The closer together the dots, the dark the area will appear.
Stippling is often wrongly called ‘Pointillism’. Pointillism is a painting technique in which small, distinct dots of colour are applied in patterns to form an image.
Stippling is often created with pen but can also be done with pencil or even digitally like the gold fish example below.
Drawing with a Paint Brush
When I think about drawing with a brush, I first think of Japanese drawings like the Hokusai drawing below.

Drawing with a brush can be intimidating for our students. The permanence of the marks and the inability to erase them feels scary. Despite this thought, the risk-taking and creative approach are well worth trying.

Drawing with Stick & Ink
What is a stick and ink drawing? It is simply drawing with a stick that has been dipped in ink.
In my department, we use old paint brushes that have hardened beyond repair and we sharpen the other end. When demonstrating how to do this I always stress to my students that the best stick and ink drawings are created when you let the ink start to run out. This way, you can create a drawing that includes a range of tones.
The drawings below were created by a Yr10 class taught by art teacher and curriculum leader Hannah Penny, from Cardiff High School. She told me:
“Yesterday we made drawing tools made from sticks, conifer branches, leaves and cocktail sticks etc. Natural dyes were prepped using beetroot juice, turmeric and dilute coffee. A test A3 page was used for experimentation to practise speed and mark making, then a natural form was selected for the drawing to be completed on the separate paper. I added a brush pen to help add definition. Extra washes were applied over the brush pen to help soften the lines and marks.
The Y10s really enjoyed the novelty of making their own tools and the success of their fast studies. These were completed in a total of one lesson!“

It’s clear students have engaged with this task. What an amazing result in just one lesson.


Drawing in Colour
Drawing in colour can breathe new life into a drawing. It can also help our students move away from always wanting to be realistic towards working creatively like an artist.

Monochromatic Drawing
A monochromatic drawing or painting is created using only one colour or hue. When you show your students examples like the one below, they soon engage and want to have a go.
Drawing with Stitch
There are many, many ways in which you could draw with stitch, both using a machine and by hand. The example below is where a student has stitched on top of a photocopy of their photograph. They glued a piece of paper to the back of the photocopy so that the glue and double layer of paper prevented the paper from ripping as it was sewn into. They have used backstitch so that the line is solid and stands out.

Drawing with Wire
Drawing with wire is a creative alternative to drawing with traditional media. I recommend soft aluminium wire for drawing as it’s easy to manipulate and cut. Follow this link for a blog post and video about drawing with wire.

The wire face below has been created with a range of different wires. They vary in thickness and colour. Before they embarked on this portrait in wire, they experimented with different wires, twisting, knotting and combining wires to achieve different effects.

Drawing with Tape
When thinking about different drawing techniques, it’s good to think outside of the box. Drawing with tape is a great way to get your students working creatively. You can draw with all sorts of different tape. The examples below use masking tape, but sellotape, gum strip, coloured tape, plastic tape, washi tape and electrical tape can all be used.


Digital Drawing with Apps
There are so many art Apps out there that it is hard to know what to choose. For example, Procreate is often the art teacher’s favourite but is not free. To be inclusive, I teach my students Adobe Fresco which can be freely downloaded. It has layers, and you can both paint and draw with it.
Having seen how some students thrive working digitally, this must have a place in your curriculum.
The mushroom images below were drawn in Adobe Fresco. Each mushroom is on a different layer, and the translucency has been turned down on some layers.
If you have enjoyed this post about different drawing techniques and are an art teacher, register below to be kept informed about future posts. You will also be able to access 3 of my free teaching resources each month too.
*The Arty Teacher Ltd has a partnership with Dryad Education. Should you purchase a product when you follow a link, The Arty Teacher Ltd would earn a commission at no extra cost to you.


Dear Ms. Sarah, you
Thank you very much for sharing your wonderful ideas for the art teachers and the students. I always appreciate you for your contribution. I have learnt so many things from your other posts too. You always make it easy to deliver Art lessons. Thanks for your guidance and help, it’s always commendable and the good intentions to help the Art Teachers is remarkable!
Thank a million. Stay blessed
always!
Kind regards, Shireen
Hi Shireen, Thank you for this lovely feedback. Much apprciated. Sarah
such wonderful information! Thank you!
Hi Kathy, Thank you for this positive feedback. I’m glad you found it useful.
Dear Ms. Sarah Crowther, your contribution to field of Art is commendable and the good intentions to help the Art Teachers and the Art students is remarkable!
Thank you sooooo much!!
GOD bless you abundantly!!!
Regards,
Surendran.
Hi Surendran, Thank you so much for this positive feedback. I love what I do! Sarah
Fantastic article
Thank you.